


In cases where a large number of subcontractor Supply Chain or Workforce records must be added to the QPR, it may be more efficient to use the Bulk Upload function.
This function allows you to upload a CSV (comma-separated value) file of subcontractor Supply Chain or Workforce data (subcontractor ABN, start date, end date, subcontract value or workforce figures, etc) in order to create multiple subcontractor records for a Quarterly Performance Report in one operation.
A CSV file must conform to a prescribed format, dependent on the type of subcontractor data in the file (Supply Chain or Workforce). You cannot mix the two types of data in the one file. The formats for each type are defined in template files that can be downloaded and edited as examples. Alternatively, you may be able to extract the data from your accounting or HR systems, as long as the extracted file matches the template format.
As part of the upload process, the records in the CSV file are validated using the same rules that apply when a subcontractor record is manually created. If all records in the field are valid, a set of subcontractor Supply Chain or Workforce entries are created and attached to the QPR. The total indigenous supply chain and workforce and performance to date figures are updated to include the newly-created records when a Bulk Upload completes.
Bulk Data Upload
Navigate to the Bulk Data Upload section of the QPR form to initiate and monitor Bulk Uploads for the QPR -
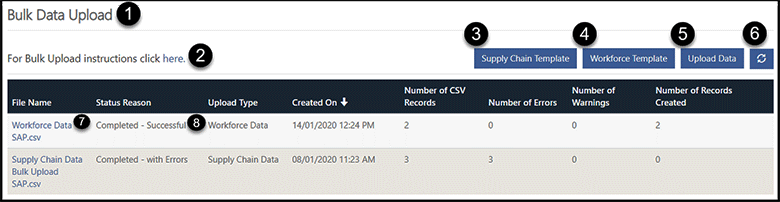
- Bulk Data Upload: the section of the QPR form used to initiate and monitor Bulk Uploads for the QPR.
- Instructions: A link to this document.
- Supply Chain Template: click to download a template file with the format required for Supply Chain uploads.
- Workforce Template: click to download a template file with the format required for Workforce uploads.
- Upload Data: click to initiate a Bulk Upload operation.
- Refresh: click to refresh the list of Bulk Upload operations. Useful for tracking the status of uploads in progress.
- File name: click to view more details about the Bulk Upload process, including any errors and warnings.
- Status Reason: indicates the progress and eventual outcome of a Bulk Upload.
Supply Chain Upload File Format and Validation Rules
Click on the Supply Chain Template link tol download a CSV file called Supply Chain Data Template.csv. The file has a single header record with the following columns -
| Column | What to enter | Notes |
|---|---|---|
| ABN | 11 digit ABN of the subcontractor. | Optional. |
| Organisation Name | Name of the subcontractor organisation. | Mandatory. |
| Direct Contact? | Yes or No. | Mandatory. Yes if the subcontract is made directly with your company, otherwise No. |
| Subcontracted To | If Direct Contact? = No, enter the name of the second-tier sub-contractor. | Mandatory if Direct Contract? = No. Otherwise should be left blank. |
| Start Date | The start date of the sub-contract. Must be greater than or equal to the MMR contract start date. | Mandatory. Valid date formats are –
Note - mmm indicates the short spelling of the month, i.e. jan, feb, mar, etc. |
| End Date | The end date of the sub-contract. Must be less than or equal to the MMR contract end date. | Mandatory. Valid date formats as per above. |
| Value | Value of the subcontract. | Mandatory. Must be greater than 0. |
| Description | A short description to provide further details about the sub-contract or sub-contractor. | Optional. |
Workforce Upload File Format and Validation Rules
Click on the Workforce Template link to download a CSV file called Workforce Data Template.csv. The file has a single header record with the following columns -
| Column | What to enter | Notes |
|---|---|---|
| ABN | 11 digit ABN of the subcontractor. | Optional. |
| Organisation Name | Name of the subcontractor organisation. | Mandatory. |
| Direct Contact? | Yes or No. | Mandatory. Yes if the subcontract is made directly with your company, otherwise No. |
| Subcontracted To | If Direct Contact? = No, enter the name of the second-tier sub-contractor. | Mandatory if Direct Contract? = No. Otherwise should be left blank. |
| Start Date | The start date of the sub-contract. Must be greater than or equal to the MMR contract start date. | Mandatory. Valid date formats are
Note - mmm indicates the short spelling of the month, i.e. jan, feb, mar, etc. |
| End Date | The end date of the sub-contract. Must be less than or equal to the MMR contract end date. |
Mandatory. |
| Total Workforce | The total number of full time employees (including Indigenous FTEs) working on this sub-contract. 2 decimal places allowed. |
Mandatory. |
| Indigenous Workforce |
The total number of Indigenous FTEs working on this sub-contract. 2 decimal places allowed. |
Mandatory. Must be less than or equal to Total Workforce. |
| Description | A short description to provide further details about the sub-contract or sub-contractor. | Optional. |
Initiating a Bulk Upload
- Using the buttons found at the top right of the Bulk Upload list, download the appropriate template for the type of subcontractor record to be created.
- Edit the file (Excel is the preferred editor) to add details of subcontracts, ensuring that the data and format conform to the validation rules described above.
- Save the file – if using Excel, ensure that you maintain the file format as CSV.
 : Note – if you can extract the required subcontractor data from your accounting or HR system, please ensure that the column headings in the extracted CSV file exactly match the column headings in the relevant template.
 -
Click the Upload Data button located at the top right hand side of the Bulk Upload list. The following form will be displayed -
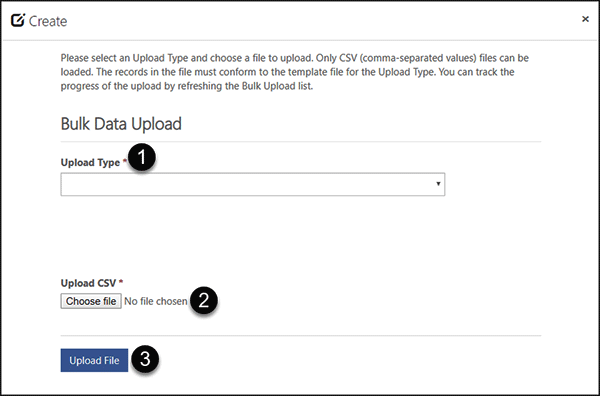
- Upload Type*: choose Supply Chain Data or Workforce Data.
- Upload CSV*: Click on Choose File and use Explorer to select the file to upload.
 : You must choose a CSV file and the file must have a .csv extension. An error will be displayed if this is not the case.
 -
Click on Upload File to start the upload process.
 : The Upload File button label will change to Adding ….
: The form will close when the file has been uploaded.
: The QPR form will be re-displayed and you should see the new upload process as the first entry in the list.
: The File Name may not initially be displayed, until the upload process has passed the validation phase.
: Use the Refresh List button to refresh the list of uploads. The Status and record/warning counts will be updated as the upload progresses.
Viewing the Outcome of a Bulk Upload
At any stage of the process and after completion, clicking on the File Name entry in the list will display a form with more details about the upload process –
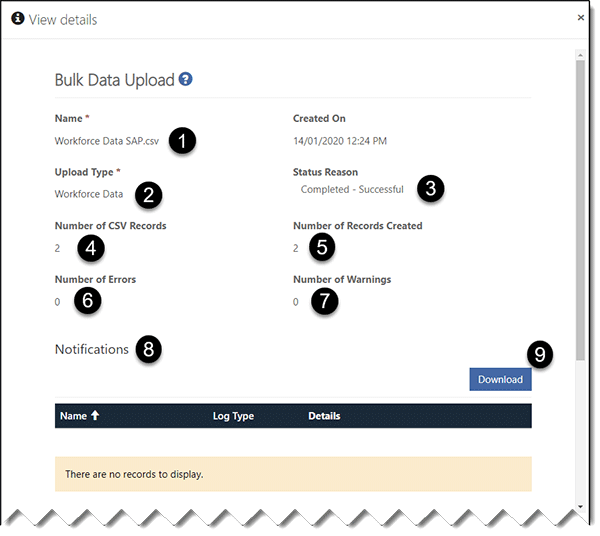
- File Name: the name of the file chosen to upload.
- Upload Type: Supply Chain Data or Workforce Data.
- Status: the outcome of the upload process. Possible outcomes are -
- Submitted – the file has been uploaded and is awaiting validation.
- Processing – the file is being validated and processed.
- Completed Successful – the CSV file was valid and supply chain or workforce records have been created.
- Completed With Warnings – the CSV file was valid and supply chain or workforce records have been created. However, one or more of the records created matched with an existing supply chain or workforce record for the QPR and may be a duplicate.
- Completed with Errors – one or more records in the CSV have a format or validation error.No supply chain or workforce records have been created.
- Number of CSV records: the number of records in the CSV file, excluding the header.
- Number of Records created: the number of supply chain or workforce records created and attached to the QPR.
- Number of Errors: number of errors in the CSV data.
: If Number of Errors is greater than 0, no supply chain or workforce records will be created. - Number of Warnings: number of potentially duplicate subcontractor records created.
- Notifications: the list of errors and warnings found in the CSV file.
- Download: click on this to download the list of errors and warnings.
- Workforce / Supply Chain: a list of the supply chain or workforce records created as a result of the Bulk Upload.
: the contents of this list will depend on the Upload Type.
Viewing Errors in a Bulk Upload
If there are any errors in an uploaded CSV file, no supply chain or workforce records will be created. Errors are displayed in the Notifications section of the Bulk Upload form –
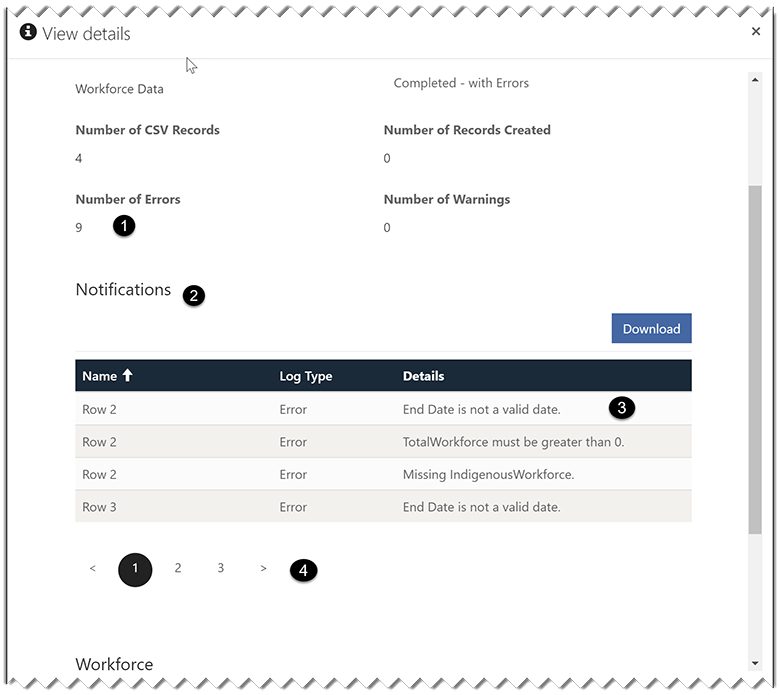
- Number of Errors: the total number of errors in the CSV file.
: If Number of Errors is greater than 0, no supply chain or workforce records have been created. - Notifications: the list of errors and warnings found in the CSV file.
- Notification: the row number in the CSV with the error(s), error type and error message(s).
: the CSV header is not counted as a row.
: If a record has more than one error, each error will be displayed in a separate Notification.
 : ABN and start/end date range checks are not done if there are missing values or date format errors. These checks are only done when all other fields are valid.
 - Pager: use the arrows to scroll though the errors if there are more than four records with errors.